Workflow: How To Create Texture Map For Game Hair Cards Using XGen
In this article, I'm gonna quickly go over my workflow of creating texture maps for game hair cards as well as some tips on using Maya's excellent XGen system. I guess it's easier than what you think.
Game hair has always been an interesting topic to talk about because of all the challenges it produces along the way. Every artist have their own way of handling them. But in general, there are only a few methods in terms of creating the texture sheet. One robust and flexible workflow, is to use Maya’s XGen system. I know, XGen may seem a bit tricky to understand at first glance, but once you’re there, it’s really easy to get the most out of it.
I have to say though, since it contains a lot of steps, I can only go over important parts. But, the good news is I share some tricks as well, which may help you troubleshoot your situation.
The Ultimate Goal
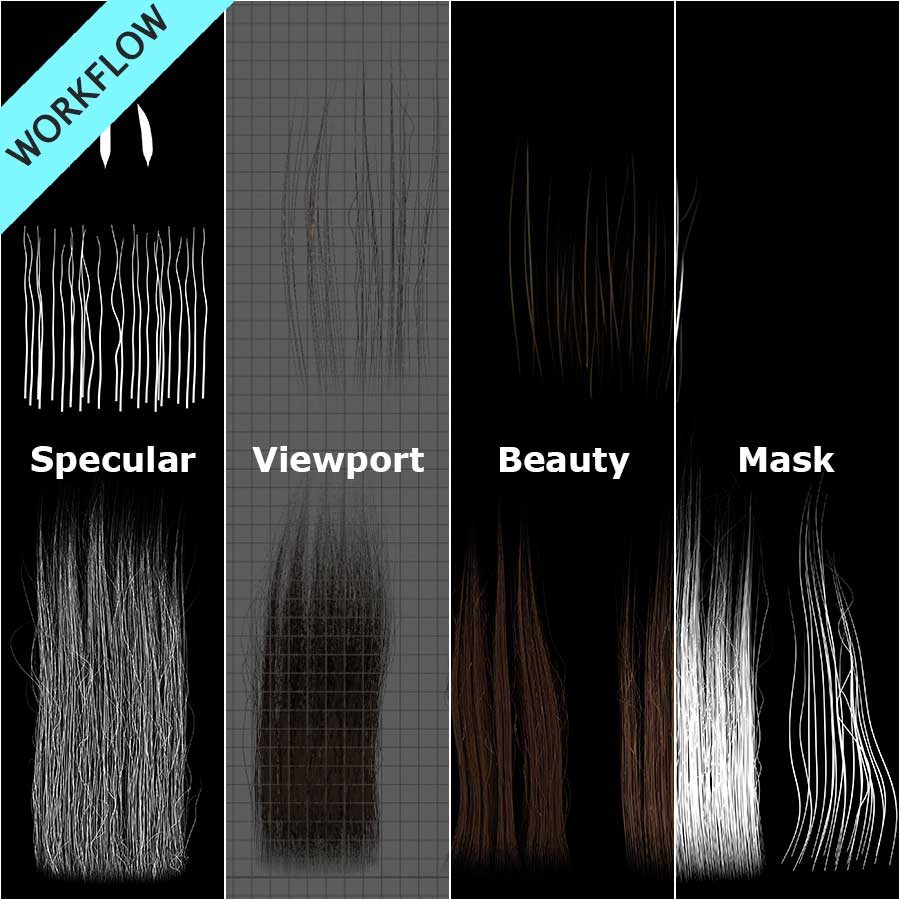
In short, we need to render out an image like the one below (it still needs some work on it though):
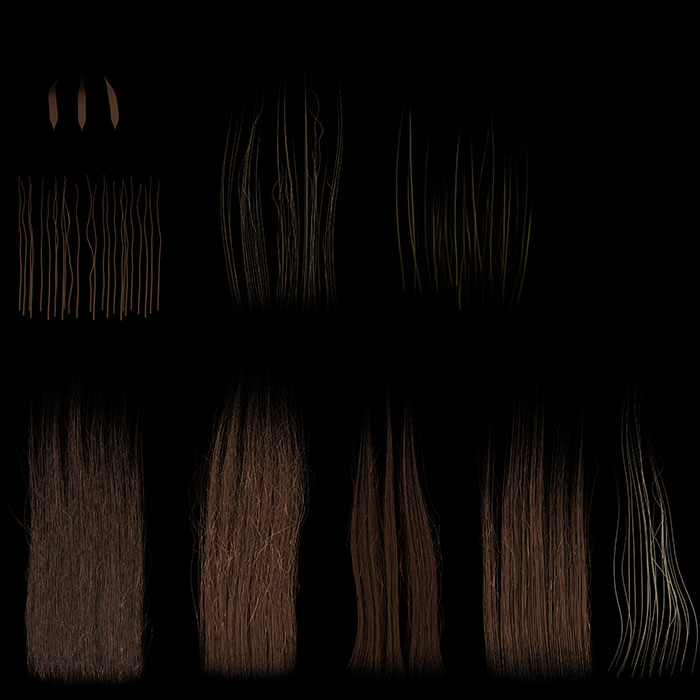
We need thick hair, to create the silhouette and cover most of the head; thinner hair for adding breakups and tinier shapes, and finally some thin strand groups and flyaways to add more details to the hair.
Overall Workflow
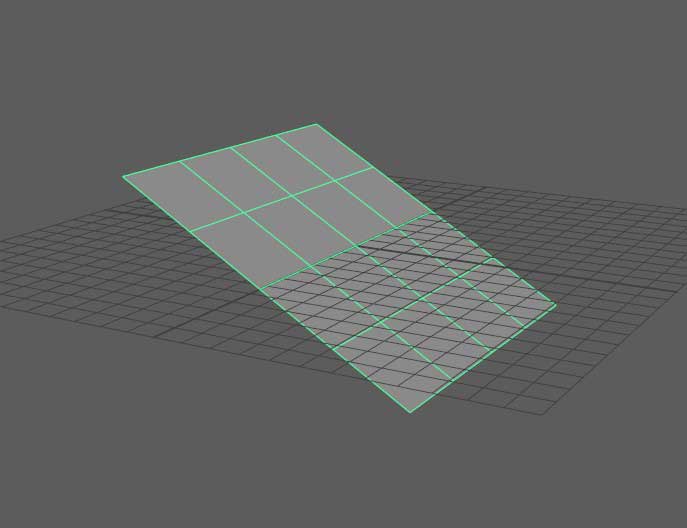
We’re gonna use a simple plane geometry for every hair group to grow from, and then will hide them in the end. Then, go to an orthographic camera, like the front cam, and set the render output resolution to a square size. I’ll go with 4K, which means -as you know- 4096*4096. Then assign an appropriate hair shader to my XGen descriptions, and add some lights. Then we will render from there, to see what we got, and adjust it eventually to get the look we want.
General Tips On XGen
Before you jump into XGen, there are several general tips to be aware of:
-
Have your project address Set correctly in Maya. File -> Set Project…
-
Make sure you use Maya’s default materials on your geometry (in our case, the planes). So, for example only use Lambert, Blinn, etc. and don’t use Arnold’s materials. Because you’re gonna have trouble seeing the maps you paint on you geometry.
-
Make sure the name of the geometry you’re using as a base for hairs to grow from, is unique.
-
Make sure your mesh has UVs, and the UVs are on the first UDIM.
-
On your geometry, Delete History and Freeze Transforms before going further.
-
For more complex XGen usages, like using some nodes in Pixar’s Renderman that are used to colorize the hair by a painted map, it’s urgent that you have no spaces in anything related to your project, otherwise it won’t work. For example, no space in the name of the geometry, in the name of the description and collection, and in the address of your project as well. So, in general, avoid space in all the names when using XGen in your project.
-
Pick your rendering engine at the beginning and do a quick research about its integration with XGen. Some versions of Maya and rendering engines, have the issue of “Activating the rendering engine plugin before activating the XGen plugin.” So, have an eye on that as well.
Important Steps
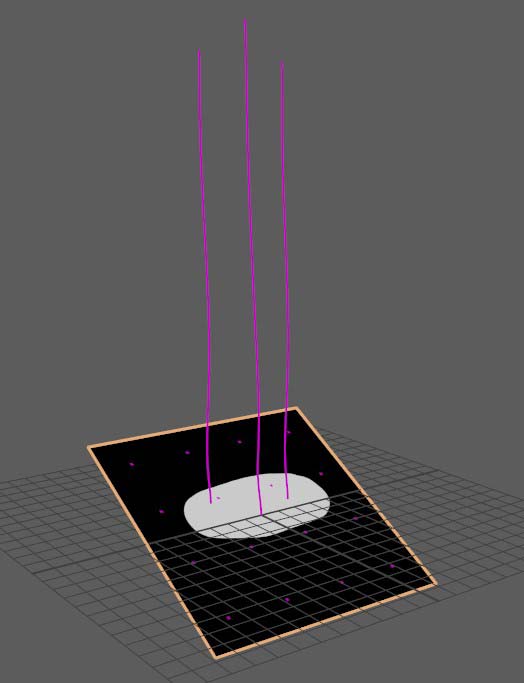
Rotate the plane around 30 degrees in X direction (if you’re gonna use front camera as your render cam). This way, we can kinda mimic the head, and give the feeling as if it’s growing from somewhere.
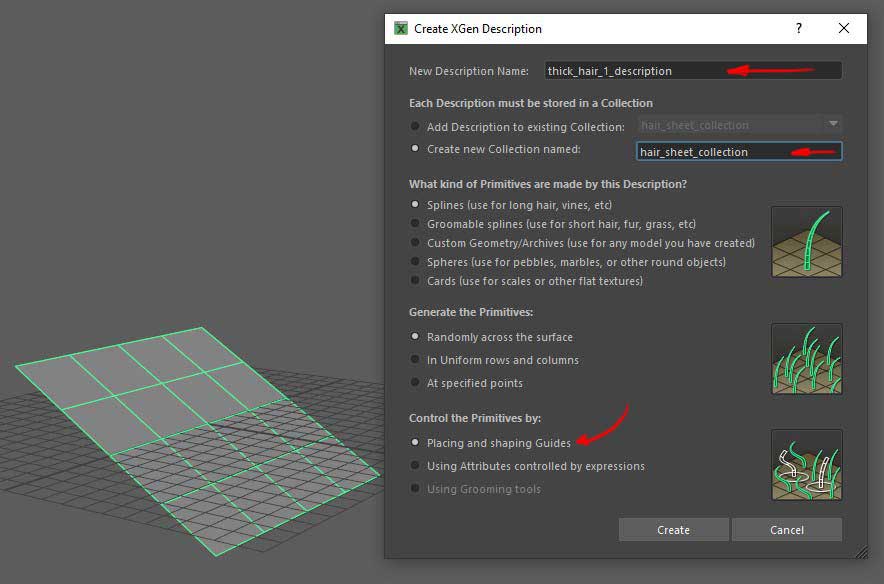
Select the plane, and hit Create New Description. Pick a name name for your Description and Collection. Remember, no space.
The only option I change, is the Control the Primitives by, which I choose Placing and shaping Guides.
XGen needs at least 3 Guides to create a preview. So, place an shape them however you please. Just remember, if you Rotate the Guides themselves and not their vertices, when you’re done with it, click on Bake Guide Vertices under the Guides menu in the XGen window.
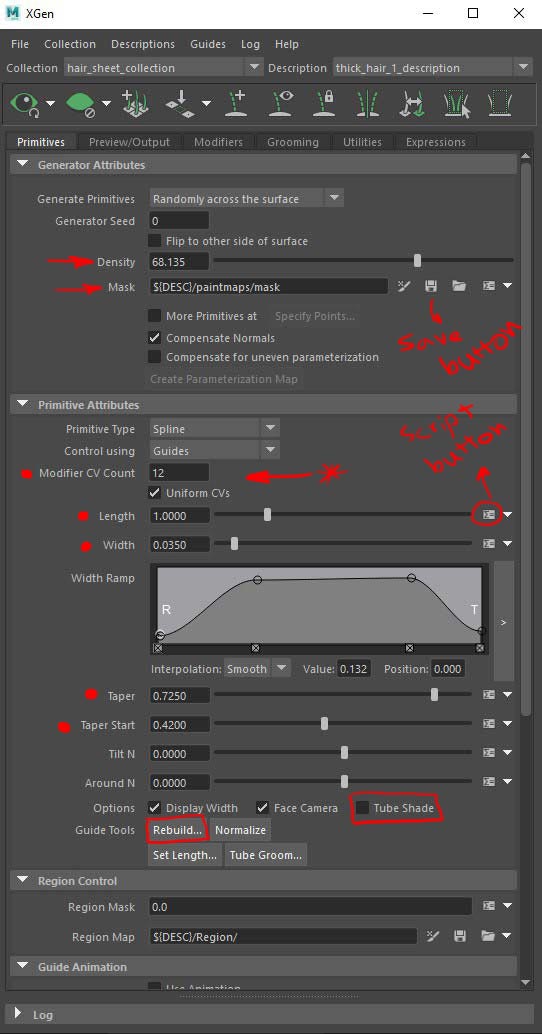
Paint a simple mask for Density. Just under the Density slider in the Primitives tab. Remember to hit save every time you make changes to every mask in XGen system. That’s how it works. If you forget to hit the save button, you won’t see the changes, because the PTex file hasn’t been generated.
In the Primitives tab, there are a couple of things to change.
First, adjust the Density slider as you see fit. Then there’s the Mask that I told you about.
Next, would be Modifier CV Count, which is basically the number of vertices on the generated hair. The more you put this value, the smoother the results will be. Also it will have a direct affect when it comes to Modifiers, which I’ll talk about later.
For the Width, a value around 0.35 is pretty accurate in terms of realism. Just for the hair sheet we’re creating, put the Width Ramp to something like the image below. The reason is, to make where the hair grow thinner, to create a more believable connection to the head late.
Taper pretty obviously, tapers the hair strands. Basically, it makes the hair like a pyramid, in which the tip is thinner than the root. Taper Start, defines at what point on the hair, the tapering will begin. For example, if you input 0.5 in there, it tells the computer to treat the hair normally from thr root to half, then from half point to the tip, eventually make the hair thinner.
If you have noticed, there a little script button in front of every slider. If you click on for example the script button of the Length, it will open a window, allowing you to add more randomness or anything you like to it.
Speaking of randomness, you can paste this code on the second line there to add more variety to the Length: $a * rand(0.8,1.2) What it tells the computer is to grab the length of every single hair, and multiply it by a random value between 0.8 and 1.2 to shorten or lengthen it. Obviously you can change the numbers as you like.
The great thing about XGen is you can do this little trick to almost everything that has that script button in front of it. Like Taper, Width, Taper Start, etc.
Next, I like to uncheck the Tube Shade option to be able to see the color of the hair a bit better in the viewport.
The Modifier CV Count that I mentioned earlier, was for the generated hair and not the Guides. If you want to add more points to the guides themselves, select them, and click on the Rebuild… button to input as many points as you like on your Guides. It helps a lot when it comes to shaping the hair.
I guess that’s all we needed in the Primitives tab.
In the Preview/Output tab, there are a couple of stuff to have an eye on.
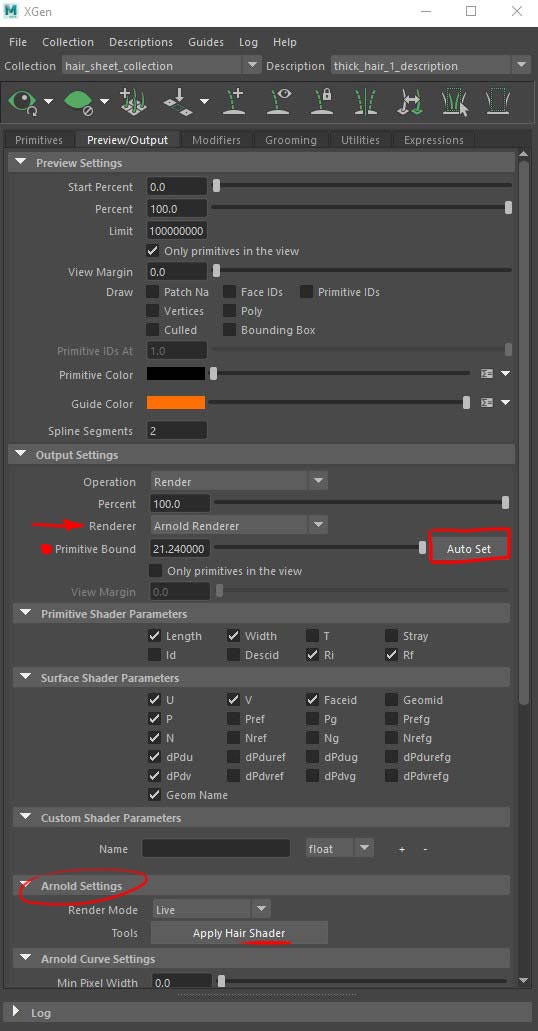
The first being the Renderer under the Output Settings. This is where you tell XGen which rendering engine you’re gonna be using in the end.
Then there’s the Primitive Bound right underneath the Renderer. Just have this in mind that every time you change your hair, come here and click on Auto Set button before you render. To make sure that the hair boundary has enough space to include all the hair you’ve created.
This tab also includes the shader information. Its options varies depending on your renderer. So I say, sometimes it’s easier to just select the Description in the Outliner, and assign a material as you would normally do in Maya. Remember, select the Description, not the Collection or any other nodes there.
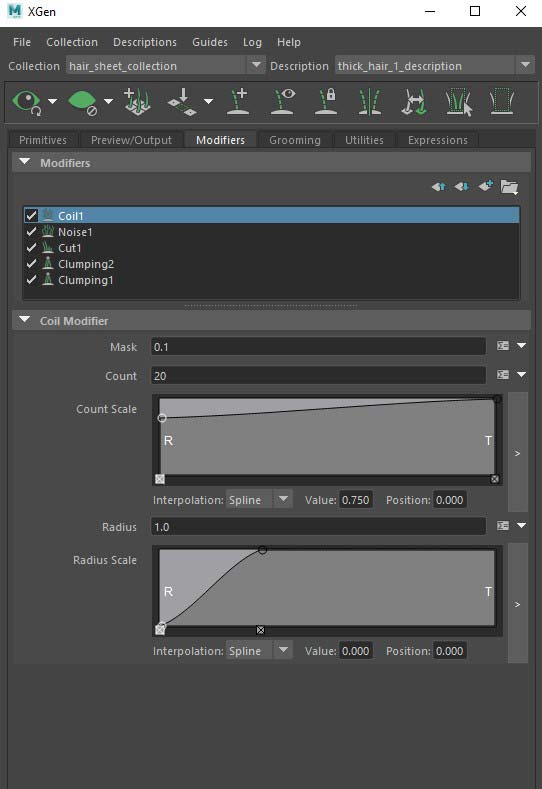
Welcome to the Modifiers tab. This is the fun part. Here, you can add details to the hair.
There are a lot of things you can do here, but let me talk about what I like to do in these situations.
I add two Clumping modifiers, the first one is the one with big broad clumps, the second one has more subtle clumps to add more details. Just have in mind that in order to use a Clumping modifier, after adding it, you need to click on Setup Maps… and Generate some sort of map to tell the computer where and how many clumps you need in your modifier.
Then, I add a Cut modifier to well, cut the hair tips to add more variety to it.
Then there’s Noise modifier, I like this one a lot because there are a lot of styling I can do only with this modifier. Play with the Magnitude, Frequency, Mask and other options to get what you need.
Next, I add a Coil, which basically has a spring-like effect on the hair. I kept it very low in my case, but you can try it out to see what you like.
Again, as I have mentioned before, the Modifier CV Count in the Primitives tab, comes to play here. The Noise and Coil modifiers for example, rely heavily on that. As with same values for them, if you change the Modifier CV Count number, you will see a different result.
You need to create a Description and do these steps for every hair group in your hair texture sheet. Each one with a different style and usage, and possibly a different material to add more variety to the color too.
Then, set your orthographic camera as if you’re seeing your texture sheet in it. Optimize the view, and have as little empty space as you can to be efficient.
Next, add a Directional Light [at least for start], check your Render Settings, and do a render to see what you get in your first try. Then from there, try to improve the results as much as you can.
About that Specular Map in the header image, it’s just a simple Ambient Occlusion applied as material to the hair Description. It still needs some heavy tweaks in Photoshop, but it’s almost there.
Conclusion
The best thing about this workflow, is its flexibility. You can come back later and change stuff as you or your art directors need. It’s also worth mentioning that this workflow is widely used in the industry level and I do the same with my professional works as well.
Generally speaking, the hair creation process is all about patience, it’s your best friend.
I guess that’s about it. Thanks for reading this article. Check out my other articles too, to see if there’s anything you like. I know you may have all sorts of questions. So don’t get lazy, ask them now in the comments.