Tips and Tricks: Sculpting Likeness
In this article, I'm gonna go over some tips and tricks I picked up so far along my career. Hope it proves worthy for you guys.
There have always been discussions on how to do likeness art. Be it drawing or sculpting. Well, first, let me make it clear; it’s totally normal to get frustrated when you begin, you’re not alone, just learn to deal with it. Your model WILL look ugly for the first 4-5 hours, or day maybe. That’s true even for industry-leading artists. It’s a hard thing to do after all.
Here, I’m gonna share some of the tips I know from my experience on sculpting likenesses.
-
First things first, gather as much references as you can. The more, the better. It’s worth it, I’m telling you. Have a special eye on those with harsher shadows. It’s gonna help you a lot when it comes to sculpting secondary shapes. Also, normally, you will need front views and a side view. Go for the ones shot with tele lenses (around 100 mm focal length in the best), which kinda flatten the face, and cause less distortion on it.
-
Have an eye on the focal length of the camera you’re sculpting to. It better be the same as your main references. If you’re using ZBrush, there’s no real camera in there, but you could change the Angle Of View under the Draw menu. Somewhere around 20 (the default is 50) will do the job. It’s worth mentioning that you could try getting your references’ EXIF info (camera information) online on websites like metapicz.
-
Anyways, aside from all those stuff about lenses and cameras, you definitely will have to eyeball lots of stuff when sculpting. You gotta train your eye, and as you grow your experience, you see more. But, how to train the eyes? Well, as you know, the most common way, is to measure. And by that, I don’t mean to measure like “the distance from the eyes to the mouth;” you will have better results if you try to measure more in-depth. Like say “the distance between the corner of the mouth, to the nasolabial fold.” The point is, to break the main distances to smaller ones to make it more trackable.
-
As I mentioned earlier, try to make good use of the shadows in your references. I mean, the shadows are not just there, they are there for a reason. And that reason is the plane change, or the shape change happening in the face. That’s really important, and why the images with harsher lighting situations are important to look for when gathering references.
-
Don’t stick with only one or two views, always look at your model from different angles. If you think that’s obvious, well, yes, but I have something else for you; change the light direction frequently as well. It could be easy to forget while sculpting. The benefits of changing the light direction is to check if you get all those shadows you see in your references and the plane changes in the face are happening nicely.
-
It’s a common mistake to for the details too soon. Well, don’t. Not until you’re happy with the basic proportions and measurements. Stay on low subdivision levels until you feel the face is recognizable (you could also ask someone if they can recognize).
-
If you’re stuck and also have time, let your brain and eyes rest for a day or two. Completely forget about it, and when you come back, you will know what to do. As you become more experienced, the need for this step lessens.
-
There’s one trick that I like to do while I’m sculpting, that is to use Photoshop’s Liquify tool on a screenshot of my work-in-progress model, to try different shapes and forms. This is definitely faster than sculpting itself, so I can see where I’m gonna go next.
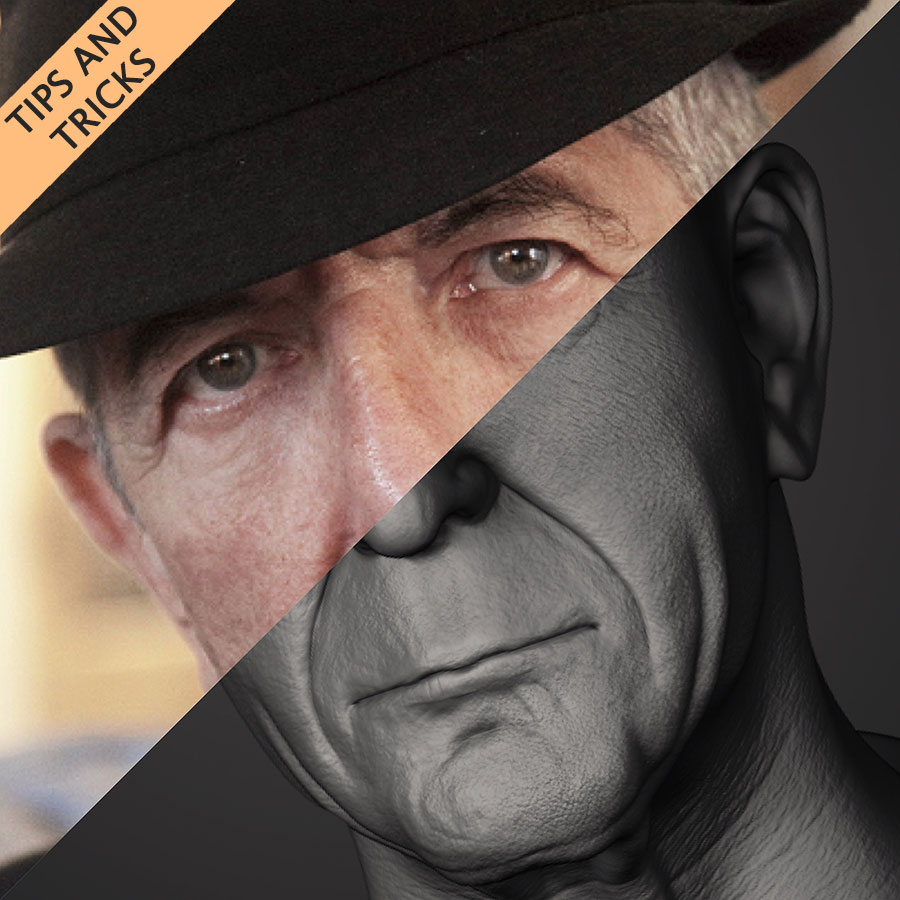
If you’re interested, you can see the full Leonard Cohen sculpt I did here.
I really hope this little article was useful for you guys. If I’m missing something, please let me know in the comments. Remember, sharing is caring!